Manual Camera Settings Made Simple For Perfect Shots
Taking control of your camera’s manual settings can feel intimidating initially. However, understanding the basics unlocks creative possibilities. Manual camera settings empower you to capture precisely the image you desire, from portraits with a blurry background to sharp landscapes. When I first used manual mode, I felt overwhelmed. But practice makes adjusting these settings second nature.
Table Of Contents:
- Why would you want to use manual mode?
- The Exposure Triangle: Aperture, Shutter Speed, and ISO
- Putting It All Together: A Step-by-Step Approach to Manual Camera Settings
- Advanced Manual Camera Settings Techniques
- Common Manual Mode Mistakes to Avoid
- Conclusion
Why would you want to use manual camera settings?
Stepping away from the ease of automatic mode and embracing manual control empowers you to truly shape your photographs, particularly in the realm of outdoor and nature photography. While auto mode guesses at the ideal settings, manual mode hands you the reins, allowing you to capture precisely the image you envision. This control becomes especially crucial in challenging lighting conditions or when you want to achieve a specific creative effect.
The Exposure Triangle: Aperture, Shutter Speed, and ISO
The exposure triangle – aperture, shutter speed, and ISO – are the core manual settings controlling image exposure. Grasping their interplay is crucial for manual mode mastery and using a settings cheat sheet, like the one you can download below, will help you get the correct image exposure when you’re in the field.
Aperture: Controlling Depth of Field
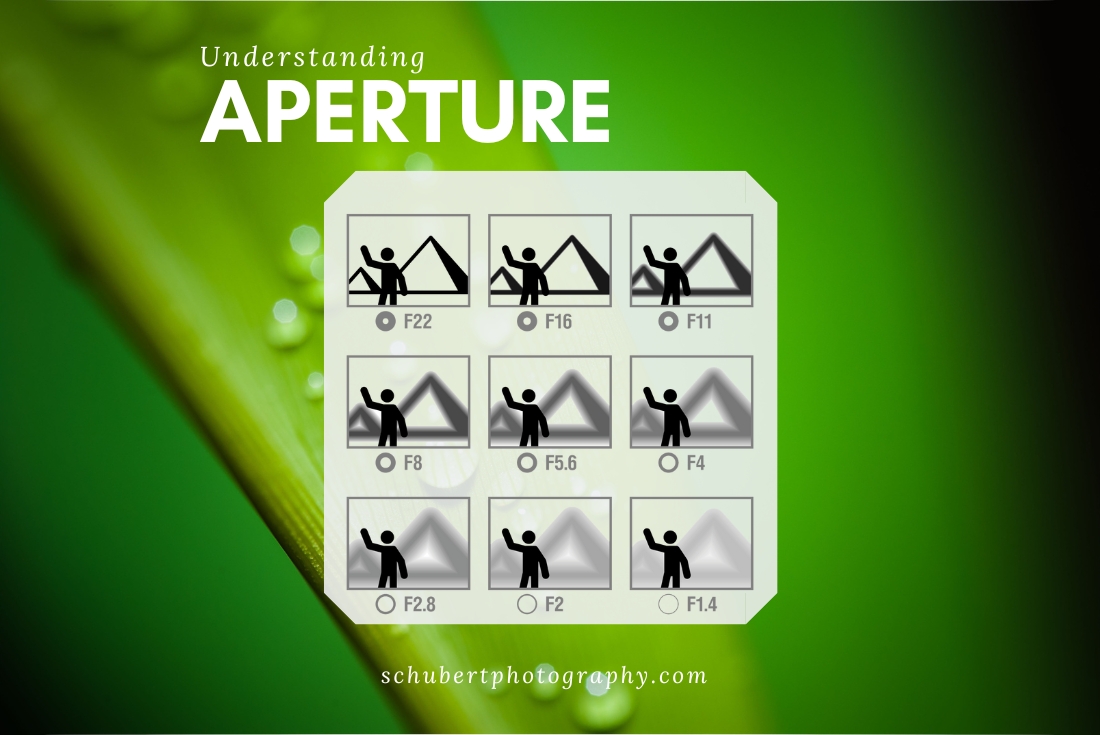
Aperture, measured in f-stops, is the lens opening’s size. Smaller f-numbers indicate wider apertures, allowing more light to hit the camera sensor.
A wide aperture (like f/1.4) creates a shallow depth of field, ideal for portraits with blurred backgrounds. For instance, the Sony FE 85mm f/1.4 lens is popular for this. Conversely, a narrow aperture (like f/16) keeps more in focus, suitable for landscapes.
Shutter Speed: Freezing or Blurring Motion
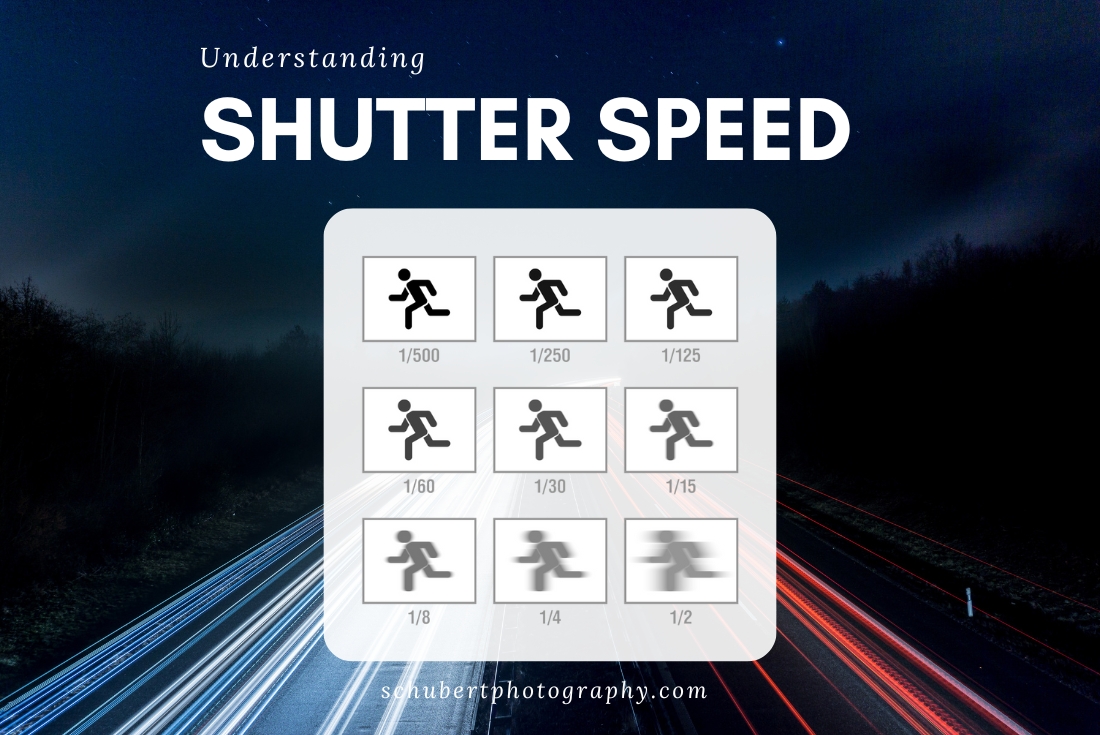
Shutter speed dictates how long the shutter stays open, impacting exposure and motion blur. Fast shutter speeds freeze action, while slow speeds blur motion.
Use faster shutter speeds for sharp images of moving subjects, effectively freezing the action. Slower shutter speeds (1-5 seconds) create motion blur, ideal for effects like light trails or dreamy waterfalls. This can result in images with appealing motion blur, often the subject of long exposure photography. You can check out this guide on waterfall photography for tips on using slow shutter speeds to achieve that silky effect in falling water.
ISO: Adjusting Light Sensitivity
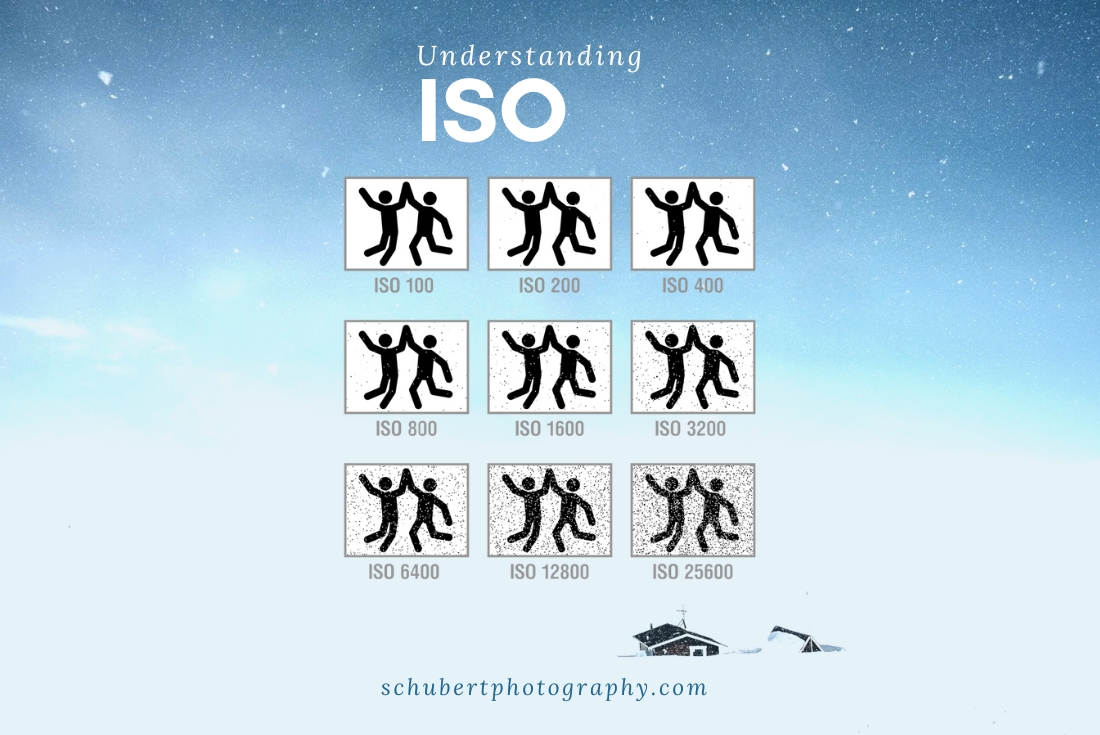
ISO represents the camera sensor’s light sensitivity. Low ISO (like 100) produces clean images but requires ample light. Higher ISOs enable shooting in low light but introduce digital noise, which can result in a darker image.
Prioritize low ISO in bright light for optimal image quality. Increase ISO only when necessary for proper exposure alongside aperture and shutter speed. This allows you to adjust ISO and shoot in low light without relying solely on fully automatic modes.
Bonus Setting: White Balance
Think of white balance as your camera’s color corrector. It helps your camera see colors correctly in different types of light. Sunlight, shade, cloudy days, and indoor lighting all have different color temperatures. Your camera needs a little help to adjust. This is especially important for outdoor and nature photos where lighting can change dramatically.
Most cameras have automatic white balance (AWB). AWB usually does a pretty good job. But sometimes, it can be a little off, especially in tricky lighting. This is where manual white balance comes in handy.
Your camera probably has some presets. These presets match common lighting situations. “Cloudy” adds warm tones to compensate for the cool light. “Shade” does the same thing. “Tungsten” or “Incandescent” cools down the yellow tones from indoor lights. “Fluorescent” removes the greenish cast from fluorescent bulbs. “Flash” compensates for the cool light of your camera’s flash.
Try these presets! See how they affect your images. You might be surprised at the difference. You can really improve your outdoor and nature photography by using the correct white balance.
For even more control, you can set a custom white balance. This is super helpful when the presets aren’t quite right. This involves taking a photo of something white or neutral gray in the same light as your subject. Your camera then uses that image as a reference point for all the other colors.
Getting the white balance right is important. It makes sure your colors look natural and true to life. This makes a huge difference in your nature photos. Accurate colors help bring out the beauty of landscapes and wildlife.
But at the end of the day, I’m calling white balance a “bonus setting” because this is one setting you can easily adjust in post processing. With the other three settings, it’s either not possible or very difficult to make changes later in Lightroom or Photoshop.
Putting It All Together: A Step-by-Step Approach to Manual Mode
Let’s outline setting up your shot in manual mode using the exposure triangle.
- Set your ISO: Begin with the lowest native ISO suitable for the lighting. For many cameras, this would be ISO 100. You’ll be able to adjust ISO if you’re shooting in lower light or night photography.
- Choose your aperture: Determine your desired depth of field. Select an appropriate f-stop. Do you want a wide aperture and shallow depth of field to isolate your subject? Or a narrow aperture and everything in focus?
- Adjust shutter speed: Use your camera’s histogram to find the correct shutter speed for a balanced exposure (more on this below). The shutter speed setting depends on if you are shooting a moving object, like capturing the action of wildlife running. Or perhaps it is a stationary object where slower shutter speeds are an option. You also need to think about whether your camera is on a tripod, in which case you don’t need to be as concerned with camera shake.
- Take a test shot and review: Evaluate image and histogram, adjusting as needed. Pay attention to the distribution of tones within your histogram.
- Fine-tune: Refine settings to realize your creative vision while retaining proper exposure. Try subtle changes in one or more of the settings to observe the changes in the final manual image. Be careful not to make the image too bright or too dark with exposure time and shutter speeds.
The “correct” exposure is subjective, depending on your artistic goals. The best settings depend on the scene and your vision.
Using Your Camera’s Histogram As A Guide To Adequate Exposure
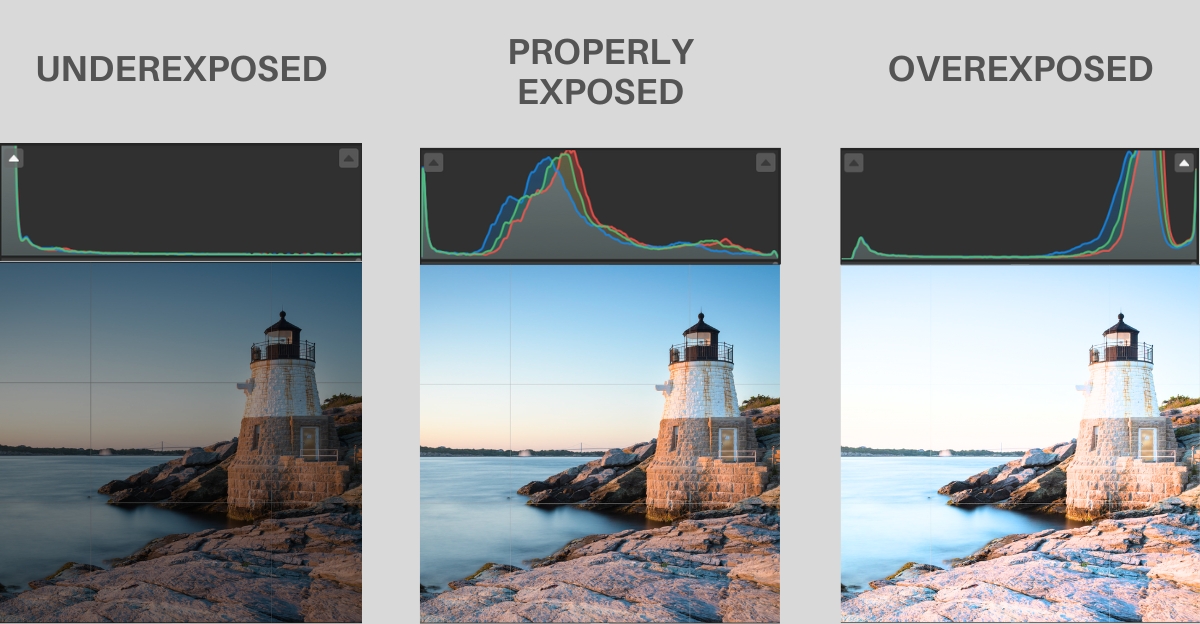
Getting the right exposure is really important for good outdoor and nature photos. A super helpful tool is your camera’s histogram. This isn’t as scary as it may sound. It’s just a simple graph showing the brightness levels in your picture. It goes from black on the left to white on the right. The height of the graph shows how many pixels are at each brightness level.
Think of it this way. A tall peak on the left means you have lots of dark areas. A tall peak on the right means you have lots of bright areas. A histogram with most of the information in the middle usually means a well-balanced exposure. But this isn’t always the case, especially with nature photography. Sometimes you want a darker or brighter look.
Let’s say you’re taking a picture of a beautiful sunset. You’ll probably have a lot of bright oranges and reds. Your histogram will show a peak on the right side. This is okay! It just reflects the bright colors in the scene. Now, if you were taking a picture of a dark forest, the histogram would show more information on the left. Again, this is fine because the scene is naturally dark.
The key is to avoid clipping. Clipping happens when you lose detail in the very bright or very dark areas of your image. On the histogram, this looks like a peak pushed up against either the left or right edge. If the graph is bunched up on the left, your shadows will be too dark, and you will have lost detail. If it’s bunched up on the right, your highlights will be too bright and washed out.
So how do you use this in the field? Check your histogram after every shot, especially when shooting in tricky lighting like at sunrise or sunset. If you see clipping, you can adjust your manual camera settings to fix it. You can use your exposure compensation to quickly brighten or darken the whole image. Or, you can play with your shutter speed, aperture, and ISO for more control. Your histogram helps you see the effect of these changes on your exposure in real-time. This will help you learn how to expose your photos properly and get much better images.
Advanced Manual Camera Settings Techniques
Once comfortable with the fundamentals, explore these advanced techniques. These techniques will give you complete control of light sensitivity, brighter image, sharp image and higher shutter speed.
Exposure Compensation
Override the meter in extreme lighting with exposure compensation. This refines exposure beyond the meter’s suggestions, allowing for creative expression. Consider it another way to make light hit the sensor as you envision it.
Bracketing
In challenging lighting, use exposure bracketing. This captures multiple shots at varying exposures, guaranteeing at least one optimal image. This increases the likelihood of a well-exposed final image. Use this with ISO aperture shutter speed and you can get some truly fantastic shots.
You can also use all of the bracketed shots to combine them in Lightroom or Photoshop for editing. Doing this will result in one image with a much larger dynamic range, the difference between the lightest and darkest tones in your photo. Think of it like a painter having more colors available on her palette to use in a painting.
Using Filters
Neutral density (ND) filters permit slower shutter speeds or wider apertures in bright light, giving you greater control over motion blur and depth of field. An adjustable ND filter offers versatility. This allows you to combine higher shutter speed and a wider aperture without making the photo too bright. A great example of this is using an ND filter while photographing a bright snowy day where you want to capture the motion blur of skiers on a mountainside.
Common Manual Mode Mistakes to Avoid
Be mindful of these common pitfalls while learning. Many new photographers are not aware of these issues.
- Forgetting to reset ISO: Double-check ISO when changing locations or lighting. Starting with the incorrect ISO can significantly impact the final image quality.
- Using too slow a shutter speed: Be wary of camera shake without a tripod at slow shutter speeds. Use a tripod or increase shutter speed when shooting handheld. You want to avoid camera shake in most images and situations. This is even more critical when shooting fast action like a car race.
- Ignoring the histogram: Don’t solely rely on the LCD preview. Use the histogram to confirm proper exposure and avoid clipping highlights or shadows. Look at the spread of the graph and its height.
- Over-relying on one setting: Consider all three exposure settings—aperture, shutter speed, and ISO—for balanced images. Changing all the parameters in your camera setting, or even just one or two can create a brighter image or a darker image.
Conclusion
Mastering manual camera settings requires practice, but the resulting creative control is rewarding. By understanding the exposure triangle, you can capture your vision. Experiment with different settings to develop your photographic style. With time, these adjustments become automatic, allowing you to concentrate on composition and capturing the perfect shot. You will no longer want to rely on the fully automatic setting, but instead, you’ll become a manual settings pro!


